
Starshipit
Starshipit Integration — Shopify Edited Order Sync (Account Editor)
This guide helps merchants using Starshipit configure the integration so that Account Editor order edits are always reflected correctly — with no mismatched totals or stale order data.
Step-by-Step Configuration
Step 1 — Enable Manual Payment Capture in Shopify
Set Shopify to hold payment in Authorized state so Starshipit cannot import the order until editing is complete and payment is captured.
- Log in to Shopify Admin
- Go to Settings → Payments
- Scroll down to Payment capture method
- Select "Manually" — Authorize payment at checkout and capture manually
- Click Save
Step 2 — Open Settings in Starshipit
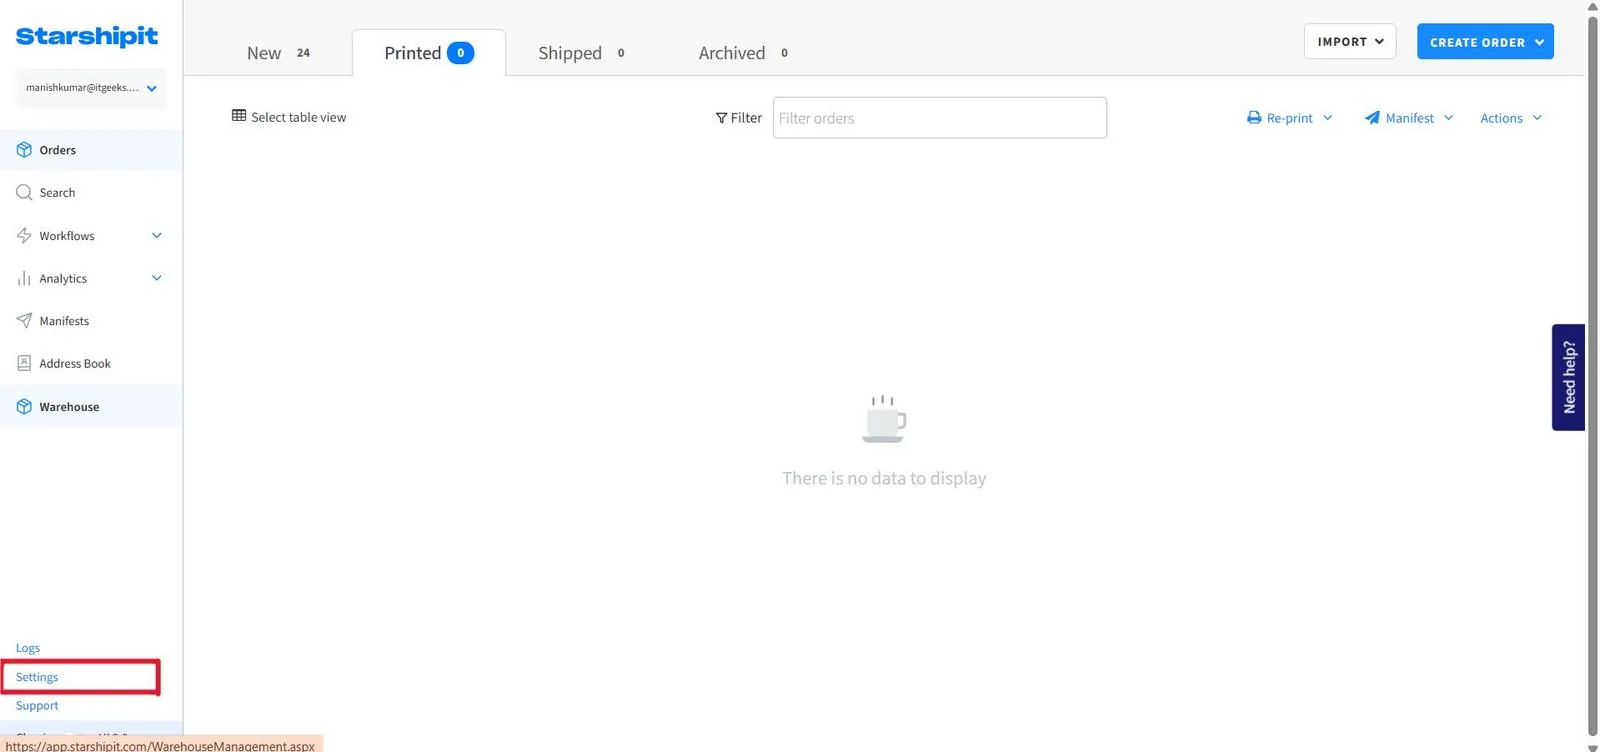
Log in to Starshipit and navigate to Settings at the bottom of the left sidebar.
- Log in to Starshipit at app.starshipit.com
- Click Settings at the bottom of the left sidebar
Step 3 — Open Integrations
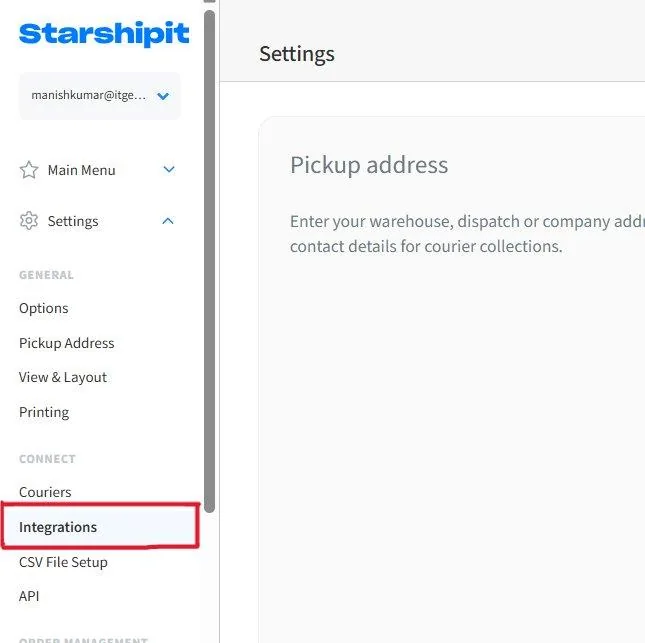
Inside Settings, find the Connect section and click Integrations.
- In the Settings sidebar, scroll to the Connect section
- Click Integrations
Step 4 — Add Your Shopify Store (First Time Setup)
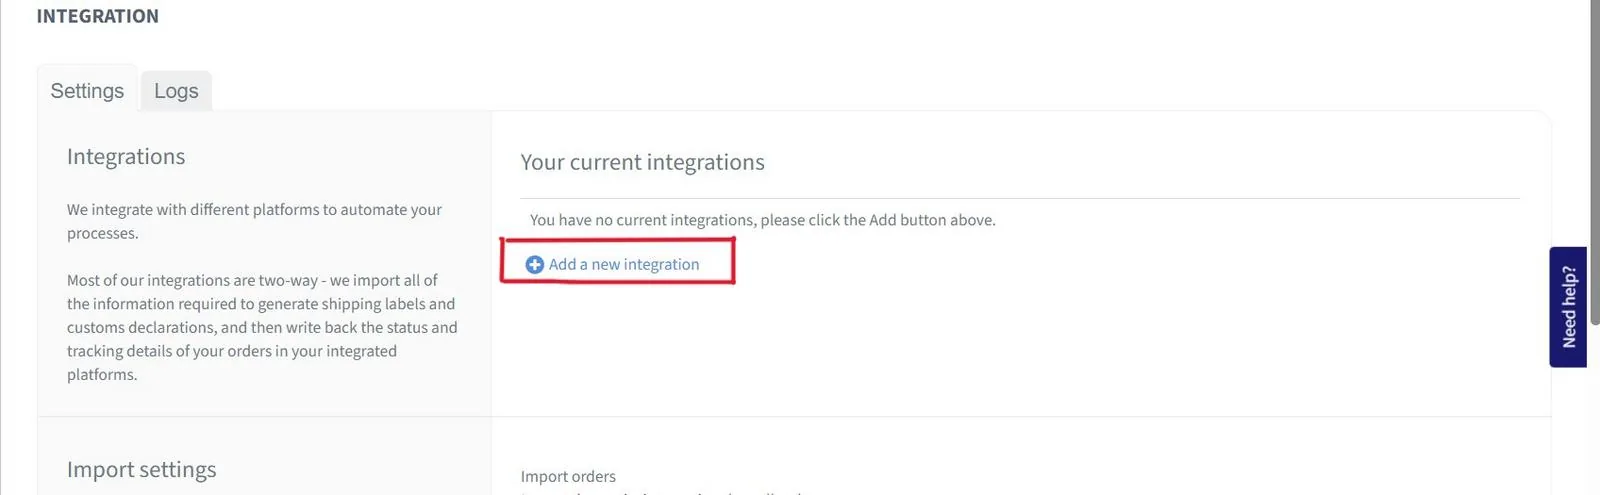
Only needed if Shopify is not connected yet. If you have not connected your Shopify store, you will see "You have no current integrations". Click Add a new integration to connect your store.
- On the Integrations page, click "+ Add a new integration"
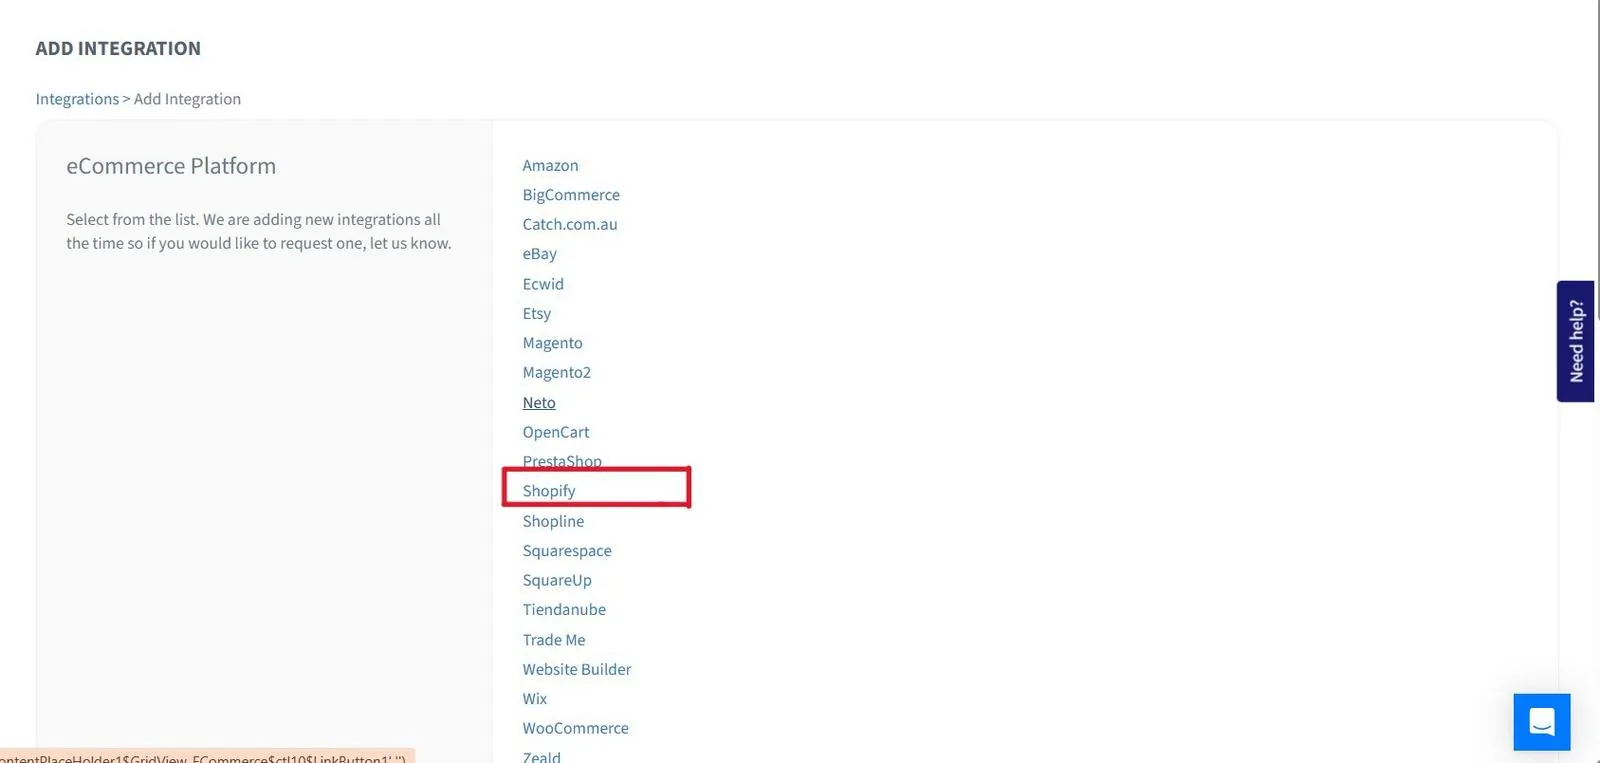
- From the eCommerce Platform list, click Shopify
- Choose Integration Version — select Enhanced for best compatibility
- Enter your Shop Name (e.g.
your-store-namefrom your-store-name.myshopify.com) - Click Authorize — you will be redirected to Shopify to approve the connection
- Click "Test to ensure it works" to verify the connection
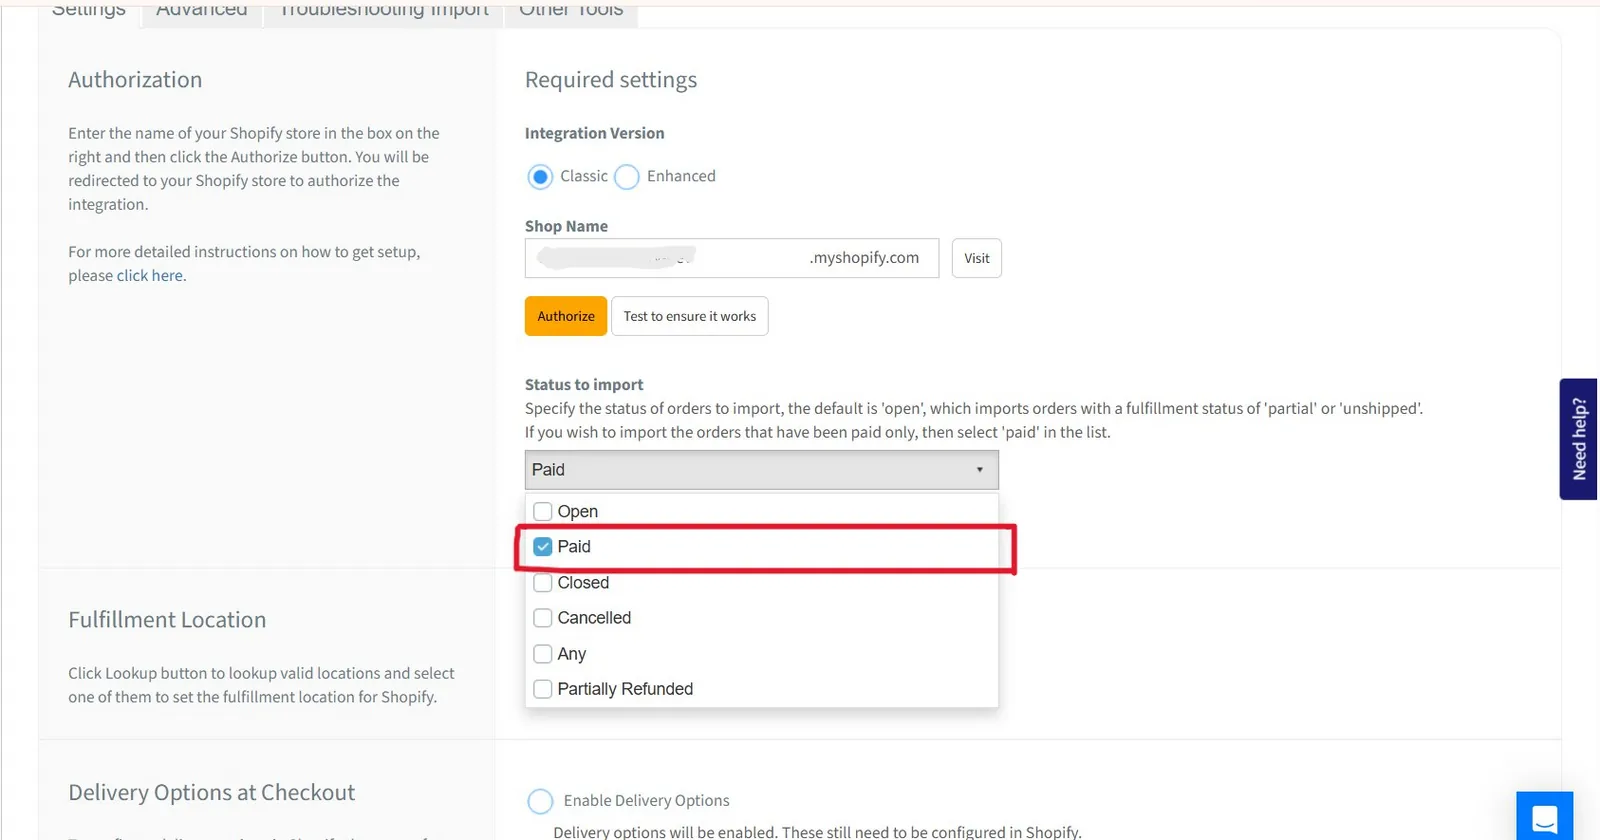
Step 5 — Set Status to Import = Paid Only
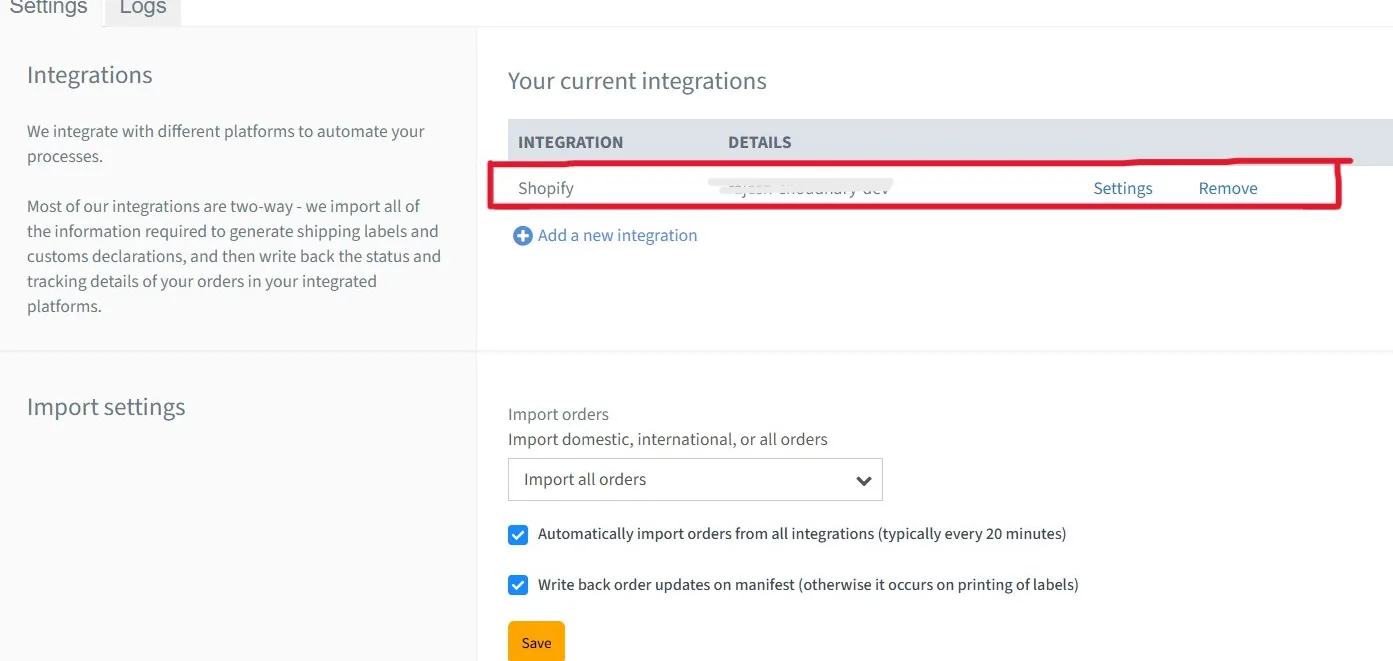
If Shopify is already connected, click Settings next to your store on the Integrations page. Then set "Status to import" to Paid only. This ensures Starshipit skips all Authorized orders and only imports when payment is captured.
- On the Integrations page, click Settings next to your Shopify store
- Find the "Status to import" section
- Click the dropdown — currently shows Any or Open
- Select Paid only
- Click Save
/
Authorized payment status — giving you a clean, uninterrupted window to edit the order in Account Editor before capturing payment.Step 6 — Edit Order in Account Editor, Then Capture Payment
Once setup is complete, follow this workflow for every order:
- New order arrives → Payment = Authorized (Starshipit skips it )
- Open order in Account Editor — add or remove items freely
- Save / commit your edits in Account Editor
- Go to Shopify Admin → open order → click Capture Payment
- Payment becomes Paid → Starshipit imports the final correct order
What happens after this setup:
- Correct order total — removed items not counted
- Added items appear correctly in Starshipit
- Quantity changes reflected instantly
- Shipping method updates supported
- If you edit after import (before dispatch) — Starshipit auto re-imports the updated order
Automate Payment Capture with Shopify Flow
Instead of manually capturing payment on every order, set up a Shopify Flow automation to manage capture while giving you a short review window for normal Online Store orders.
Step 1 — Trigger
A new order is created in your store.
Step 2 — Condition 1: Sales Channel Check
The flow checks whether the order came from the Online Store.
- If NOT from Online Store (e.g. POS or draft order) → capture payment immediately
- If from Online Store → continue to the next check
Step 3 — Condition 2: Fraud Risk Check
Shopify's fraud analysis checks the order risk level.
- If risk level is HIGH → capture payment immediately (review these orders manually)
- If risk is not HIGH → continue to the next check
Step 4 — Condition 3: Restricted Tag Check
The flow checks whether the order is tagged restricted.
- If tagged "restricted" → capture payment immediately
- If not restricted → wait 15 minutes, then capture payment
Flow Summary
| Scenario | Action |
|---|---|
| Order from other channels (not Online Store) | Capture immediately |
| Online Store + HIGH risk | Capture immediately |
| Online Store + tagged "restricted" | Capture immediately |
| Online Store + normal order | Wait 15 min, then capture |
Common Issues & Fixes
| Issue | Likely Cause | Fix |
|---|---|---|
| Starshipit imports order before editing is done | Status to import includes "Open" or "Any" | Change Status to import = "Paid" only |
| Orders not appearing after payment capture | Auto import disabled | Settings → Integrations → check "Automatically import orders from all integrations" |
| Edited order not updating in Starshipit | Order already dispatched | Always edit before dispatch — edits sync automatically only for undispatched orders |
| Authorization expired before capture | 7-day window missed | Capture payment within 7 days of order placement |
| Connection test fails on setup | Wrong shop name or permissions not granted | Re-enter shop name exactly as shown in your Shopify URL → click Authorize again |
Best Practices
- Always set Status to import = Paid only — never leave it as Open or Any
- Use Enhanced integration version for best Shopify compatibility
- Edit orders in Account Editor before capturing payment for the cleanest workflow
- Even post-import edits work in Starshipit — but always edit before dispatch to avoid label reprinting
- Enable "Automatically import orders" in Import Settings for orders to sync every 20 minutes
Need Help?
If orders still don't sync correctly after following this guide, contact Account Editor Support and share:
- Your store URL
- Screenshot of Starshipit → Integrations → Shopify Settings
- Screenshot of Shopify payment capture setting
- The affected order number